How can I be sure the fabric I'm adding will cover the area it needs to?

THE BUTTERFLY TRICK
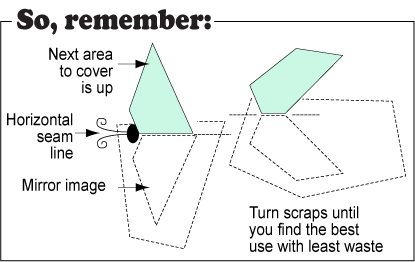
1 To cover pattern with fabric, always begin by turning your pattern so that the last piece added (A) is on the bottom, the seam to be sewn (B) is horizontal in the middle, and the area to be covered (C) is above the seam line. (Piece #2 will be added in this example.)
2 Isolate in your mind the shape of the area to be covered. Imagine it as the top wing of a beautiful, symmetrical butterfly. In your mind, flip the shape over and down to make the bottom wing of the butterfly. It is this bottom shape (plus the seam allowance) that must fit on the fabric you are adding.
3 You can get the same effect if you crease the pattern on the seam line with your thumbnail and fold it down to see if the area (plus the seam allowance) will fit onto the scrap you have chosen. After a little practice, you often won’t have to flip the pattern down; you’ll only have to imagine that bottom wing.
4 The new fabric is placed right side up under the pattern so that the top edge is 1/4" above the seam line. Holding paper and fabric together with your fingers, turn everything so it will slide under the presser foot. Sew the seam...trim the seam allowance...
5 ...and the added fabric will flip over and cover the area nicely. Trim away the excess fabric around the outside of the shape, leaving a 1/4" seam allowance. Add the next piece, starting with step #1.
TRY IT! This will work for any-shaped piece...just be sure to keep the
seam line horizontal in the middle.


